

How to Easily Tighten a Kitchen Faucet Nut Under Sink?
Welcome to the LEFTON family! At LEFTON, we're not just about selling top-tier sanitary products; we're about empowering you with the knowledge and skills to maintain a home that's both beautiful and functional. Today, we're tackling a common household nuisance that, if left unchecked, can lead to bigger problems down the line: a loose kitchen faucet nut. But fear not! With this guide, we'll walk you through the process of tightening that nut with ease and confidence.
Preparing for the Task
First things first, let's get ready to rumble with that kitchen faucet nut. It's not every day you find yourself under the sink, so let's make this venture as comfortable and efficient as possible.
- Clear Out the Sink Cabinet:Trust us, nothing's worse than lying on a cold, hard floor surrounded by cleaning supplies and those plastic bags you keep forgetting to recycle. Clear the area, give it a quick wipe, and you've just upgraded your workspace from cramped to cozy.
- Gather Your Tools: You'll need an adjustable wrench (or a basin wrench if you have one) and a flashlight to light up the dark corners under the sink. If you're dealing with winged nuts, you might get away without using tools, but it's good to have them just in case.
Understanding Your Kitchen Faucet
Before we dive under the sink, let's talk about what you're working with. Kitchen sink faucets generally come in two types: single-handle and double-handle. Single-handle kitchen sink faucets blend hot and cold water through one lever, making the nut's location fairly straightforward—directly underneath the handle. Double-handle faucets, on the other hand, may have you playing a bit of a guessing game, as the nuts can be under each handle. Identifying your faucet type will save you from a mini existential crisis mid-repair.

Related: Single Handle vs Double Handle Kitchen Sink Faucet
Step-by-Step Guide
Step 1: Clear Out the Sink Cabinet
You've probably skipped this step in other DIY endeavors (we're not judging), but this time it's non-negotiable. A clear space means a clear mind, and you'll need both as you become intimately acquainted with the underside of your sink.

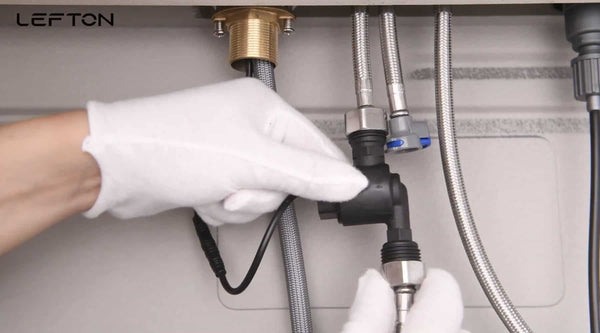
Step 2: Locate the Faucet Nut
Arm yourself with your flashlight and slither into your newly decluttered cabinet space. Shine your light towards the back of the cabinet to find your water lines—they'll lead you right to your target: the elusive faucet nut. If you're working with a double-handle faucet, you'll have two nuts to contend with, one under each handle. Single-handle? Just the one nut directly beneath.
Identifying the Nut Type: Here's where you become a nut connoisseur. Winged nuts, often made from nylon or plastic, have flanges that look like wings—hence the name. They're hand-tightenable, which is great news for your tool kit (and your back). Standard nuts, typically metal, are less forgiving and will require the use of your wrench.
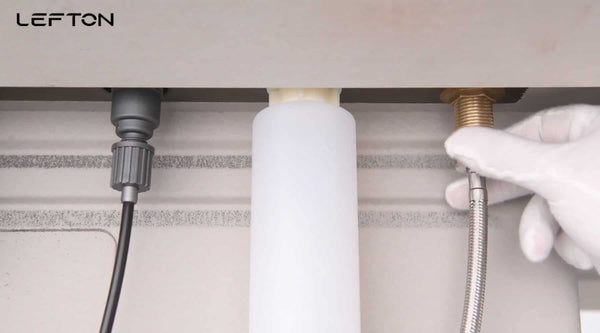
Step 3: Tighten the Faucet Nut
With the type of nut identified, it's time to get down to business. For winged nuts, give them a firm twist by hand until they're snug. For standard nuts, wrap your wrench around the nut and tighten it by turning clockwise. Remember, this is a precision task, not a test of strength. Over-tightening can damage your sink or the faucet itself, so aim for snug, not superhuman tight.
Related: How to Clean Your Kitchen Faucet Head?
FAQs
Q: What if the nut doesn't tighten?
A: If the nut doesn't tighten, it could be stripped or damaged. You might need to replace it with a new one. Ensure you purchase the correct size and type for your faucet.
Q: Can I use any wrench for this task?
A: While you can use a standard adjustable wrench, a basin wrench is specifically designed for tight spaces under the sink and might make the job easier.
Q: How often should I check my faucet nuts?
A: It's a good idea to check your faucet nuts for tightness at least once a year or if you notice any looseness or leakage.
Q: What are the signs that a faucet might need tightening?
A: Signs include the faucet handle or base moving when it shouldn't, water leakage at the base of the faucet, or reduced water pressure, which might indicate an issue with internal components.
Q: Is it worth calling a professional for a loose faucet nut?
A: If you're uncomfortable with DIY repairs, the problem persists after your attempt to tighten it, or if the faucet requires the replacement of parts, it's worth calling a professional plumber to ensure a proper fix.
Conclusion
Although this guide begins to unravel the mystery of tightening a kitchen faucet nut, remember that the journey doesn't end here. Regular maintenance checks and understanding when to call in a professional are key to keeping your kitchen in top shape. And, of course, LEFTON is here to support you every step of the way, from providing high-quality sanitary products to offering handy DIY tips for the modern homeowner.
Explorează mai mult
Imparte asta
Popular posts


Lasa un comentariu